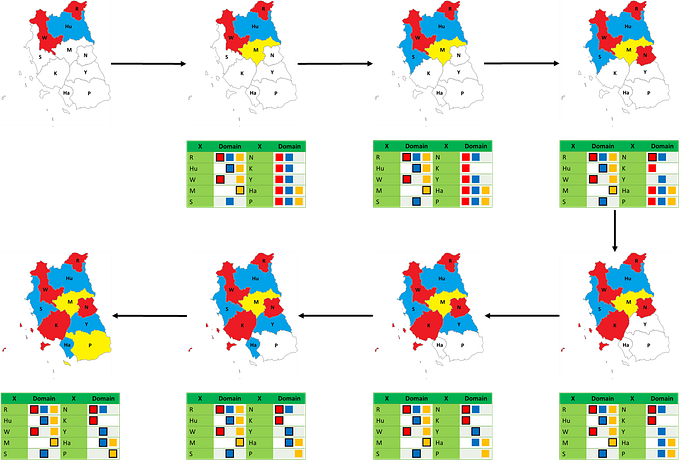
อธิบายพื้นฐาน U-Net พร้อมโค้ด PyTorch🔥
เนื้อหาในบทความนี้ได้แก่
2.1 Contracting Path (encoder)
- ทำให้ข้อมูลขนาดใหญ่ขึ้น
- นำไปรวมกับข้อมูลฝั่ง encoder ผ่าน skip connection
- นำข้อมูลเข้า convolutional layer
1. เกริ่นนำ
จากความสามารถของ CNN ที่เคยเขียนไปใน อธิบายพื้นฐาน CNN พร้อมโค้ด PyTorch🔥 เห็นได้ว่า output สุดท้ายที่ต้องการจากโมเดลคือ class ของรูปภาพนั้น แต่มีอีกหลายงานที่ต้องการทราบตำแหน่งของ class ที่สนใจในรูปภาพด้วย ซึ่งหมายความว่าโมเดลต้องสามารถระบุ class ของแต่ละ pixel ได้ เราเรียกสิ่งนี้ว่าการทำ “segmentation” จึงมีการคิดค้น “fully convolutional network” (FCN) โดยสิ่งที่แตกต่างจาก CNN คือนำ convolutional layer มาแทนที่ FC layer ในช่วงท้ายของโมเดล เพื่อทำ upsampling โดยใช้ deconvolution หรือ up convolution หรือ transposed convolution หรือ fractional stride convolution (มีหลายชื่อ) เพื่อให้ output มีขนาดใหญ่ขึ้นจนกลับมาเป็นรูปภาพอีกครั้ง ตามภาพด้านล่าง

ต่อมาได้มีการทำโครงสร้างของ FCN มาปรับปรุงเพื่อให้สามารถทำงานได้แม่นยำขึ้นถึงแม้จะมีรูปภาพสำหรับ train น้อย ซึ่งโมเดลนั้นก็คือ “U-Net”
2. โครสร้างของ U-Net
จากภาพด้านล่าง เห็นได้ว่าโครงสร้างของโมเดลเป็นรูปตัว U ดังนั้นจึงเป็นที่มาของชื่อ “U-Net”, U-Net ประกอบด้วย 2 ส่วนคือ
- Contracting Path (encoder) คือส่วนโค้งลง
- Expanding Path (decoder) คือส่วนโค้งขึ้น

2.1 Contracting Path (encoder)
หรือ downsampling หลักการเหมือนกับใน CNN คือดึง feature ที่สำคัญผ่าน convolution layer และทำให้ข้อมูลเล็กลงโดยใช้ pooling layer วิธีการคำนวณขนาด, ค่าที่อยู่ใน output รวมถึงการเขียนออกมาโดยใช้ PyTorch เหมือนกับที่อธิบายไว้ในส่วนของ CNN
encoder สามารถแบ่งออกมาได้ 5 blocks ตามจำนวน filter ได้แก่ 64, 128, 256, 512 และ 1024 ตามภาพด้านล่าง

2.2 Expanding Path (decoder)

หรือ upsampling คือการสร้างรูปภาพใหม่ขึ้นมาอีกครั้ง (reconstruction) จากรูปภาพขนาดเล็ก มี 3 ขั้นตอนย่อยคือ
- ทำให้ข้อมูลขนาดใหญ่ขึ้น (จำนวน channel เท่าเดิม แต่เพิ่ม height กับ width)
- นำไปรวมกับข้อมูลฝั่ง encoder ผ่าน skip connection
- นำข้อมูลเข้า convolutional layer
1. ทำให้ข้อมูลขนาดใหญ่ขึ้น
ถ้าเป็น U-Net แบบดั้งเดิม (ที่ถูกเผยแพร่เมื่อปี 2015) ใช้วิธี up convolution หรือ transpose convolution แต่ถ้าเป็น U-Net สมัยใหม่มักใช้วิธีอื่นเพื่อลดข้อผิดพลาดในการ upsampling เช่น bilinear interpolation ด้านล่างต่อไปนี้จะอธิบายทั้งวิธี up convolution และ bilinear interpolation
Up convolution
คือการนำ kernel คำนวณ output ออกมา, parameter ที่สำคัญก็เช่นเดียวกับของ convolutional layer ที่อยู่ใน CNN สูตรหาขนาดของ output ที่ออกมาคือ
output size = (input size -1)×stride - 2×padding + kernel sizeซึ่งตาม paper ใช้ kernel ขนาด 2 × 2
ตัวอย่างการคำนวณ output โดยใช้ up convolution
ตัวอย่างที่ 1
กำหนด input ขนาด 2 × 2 มีค่าด้านในคือ

กำหนด kernel ขนาด 2 × 2 มีค่าด้านในคือ

กำหนด stride = 1, padding = 0
ได้ว่าขนาดของ output ที่จะออกมาคือ (2-1)×1- 2×0 + 2 = 3
Step1
เริ่มต้นกำหนดให้ค่าใน output คือ 0 ทั้งหมด

Step2
นำค่าใน input มุมซ้ายสุดคูณกับ kernel และนำผลลัพธ์ไปรวมกับค่าใน output โดยเริ่มจากมุมบนซ้ายสุด

Step3
นำ input ตัวถัดมาคูณกับ kernel และนำผลลัพธ์ไปรวมกับค่าใน output โดยตำแหน่งของ output ที่บวกด้วยเลื่อนไปทางซ้ายตตามค่า stride ซึ่งในที่นี้คือ 1 ดังนั้นเลื่อนไปทางขวา 1 ช่อง

Step4
ทำเหมือนกับ step3 ในกรณีที่ใน output ไม่สามารถเลื่อนไปทางขวาตามขนาด stride ได้แล้วก็เลื่อนลงด้านล่างตามขนาด stride ซึ่งในที่นี้คือ 1 ดังนั้นเลื่อนลงล่าง 1 ช่อง
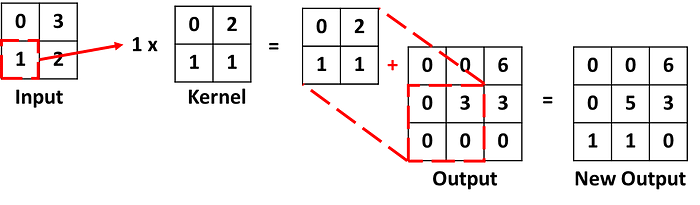
Step5
ทำแบบเดิมไปเรื่อยๆจน ทุกค่าใน input ถูกคำนวณ

จากตัวอย่างด้านบนสามารถใช้ PyTorch เขียนออกมาได้ว่า
import torch
import torch.nn as nn

# ใช้ nn.ConvTranspose2d สร้าง up convolution สำหรับ 2D CNN
up_conv = nn.ConvTranspose2d(in_channels=1, out_channels=1, kernel_size=2, stride=1, padding=0)

# กำหนดค่าใน input
input_tensor = torch.tensor([[[[0., 3.],
                               [1., 2.]]]])

# กำหนดค่าที่อยู่ใน kernel
up_conv.weight.data = torch.tensor([[[[0., 2.],
                                      [1., 1.]]]])

up_conv.bias.data = torch.tensor([0.0])

output_tensor = up_conv(input_tensor)
ได้ผลลัพธ์ออกมาคือ
tensor([[[[0., 0., 6.],
          [0., 5., 7.],
          [1., 3., 2.]]]], grad_fn=<ConvolutionBackward0>)
ตัวอย่างที่ 2
กำหนด input ขนาด 3 × 3 มีค่าด้านในคือ

กำหนด kernel ขนาด 2 × 2 มีค่าด้านในคือ

กำหนด stride = 1, padding = 1
ได้ว่าขนาดของ output ที่จะออกมาคือ (3–1)×1- 2×1 + 2 = 2
Step1
เหมือนกับตัวอย่างที่ 1 กำหนดให้ค่าใน output คือ 0 ทั้งหมด

Step2
ใช้วิธีเดียวกับตัวอย่าง1 คำนวณผลลัพธ์ระหว่าง input กับ kernel แต่เมื่อไปรวมกับ output เวลาทาบต้องเหลือขอบตามค่า padding ด้วย ในที่นี้ padding เท่ากับ 1 ดังนั้นเหลือขอบไว้ 1 ช่อง

Step3
นำ input ตัวถัดมาคูณกับ kernel และนำผลลัพธ์ไปรวมกับค่าใน output โดยตำแหน่งของ output ที่บวกด้วยเลื่อนไปทางซ้ายตตามค่า stride ซึ่งในที่นี้คือ 1 ดังนั้นเลื่อนไปทางขวา 1 ช่อง

Step4
ทำแบบเดิมไปเรื่อยๆจน ทุกค่าใน input ถูกคำนวณ
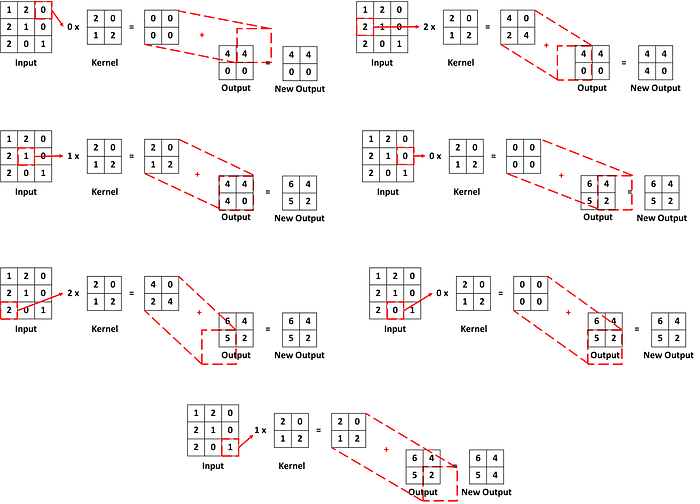
จากตัวอย่างด้านบนสามารถใช้ PyTorch เขียนออกมาได้ว่า
import torch
import torch.nn as nn

up_conv = nn.ConvTranspose2d(in_channels=1, out_channels=1, kernel_size=2, stride=1, padding=1)

input_tensor = torch.tensor([[[[1., 2., 0.],
                               [2., 1., 0.],
                               [2., 0., 1.]]]])


up_conv.weight.data = torch.tensor([[[[2., 0.],
                                      [1., 2.]]]])

up_conv.bias.data = torch.tensor([0.0])

output_tensor = up_conv(input_tensor)
ได้ผลลัพธ์ออกมาคือ
tensor([[[[6., 4.],
          [5., 4.]]]], grad_fn=<ConvolutionBackward0>)
เช่นเดียวกับ CNN ค่าใน kernel ที่เรากำหนดใน 2 ตัวอย่างด้านบนนั้น แท้จริงแล้วคือ weight ของโมเดลซึ่งจะมีการปรับเองระหว่าง train model
Bilinear interpolation
คือการหาค่าที่ไม่รู้จากค่าที่รู้ในตำแหน่งที่ใกล้กัน มีสูตรคือ กำหนดให้ จุด Q₁₁ อยู่ที่ (x₁, y₁), จุด Q₂₁ อยู่ที่ (x₂, y₁) ค่าที่ต้องการหาอยู่ที่จุด R₁ ซึ่งอยู่ตำแหน่ง (x, y₁) ตามภาพด้านล่าง

กำหดให้ f(Q₁₁) คือค่าที่อยู่บนจุด Q₁₁ และ f(Q₂₁) คือค่าที่อยู่บนจุด Q₂₁ ดังนั้ได้ว่าค่าที่อยู่บนจุด R₁ คือ

จากสูตรด้านบนเป็นกรณีที่ค่า y คงที่ แต่ถ้าในกรณีที่ x คงที่ก็สลับตำแหน่งระหว่าง x กับ y ตามสูตร
จาก paper, upsampling ของ U-Net ต้องการให้ output มีขนาดเป็น 2 เท่าของ input (factor =2) ดังนั้นตัวอย่างด้านล่างต่อไปนี้จะเสนองกรณีที่ได้ output มีขนาด 2 เท่าจาก input
ตัวอย่างการคำนวณ output โดยใช้ bilinear interpolation
ตัวอย่างที่ 1
กำหนด input ขนาด 2 × 2 มีค่าด้านในคือ

ดังนั้น output ที่ออกมามีขนาด 4 × 4
Step1
นำค่าทั้ง 4 ของ input อยู่ที่มุมทั้ง 4 ด้านของ output กำหนดเลข row และ column แทนพิกัดของและค่า

Step2
ใช้สูตรด้านบนคำนวณหาค่าในช่องที่ไม่ทราบค่า เช่นช่อง (C, R) = (2, 1) มีตำแหน่งที่ทราบค่าอยู่แล้วที่ (1, 1) คือ 1 และพิกัด (4, 1) คือ 2 ดังนั้นได้ [(4–2) / (4–1)]×1 + [(2–1) / (4–1)]×2 = 2/3 + 2/3 = 4/3 ≈ 1.33

Step3
ในการณีที่อยู่ column เดียวกัน แต่คนละ row เช่นต้องการทราบค่าของ (1, 2) ต้องใช้ค่าของ (1, 1) กับ (1, 4) ก็สลับค่า x, y ของสูตรด้านบน ได้คำตอบคือ [(4–2) / (4–1)]×1 + [(2–1) / (4–1)]×3 = 2/3 + 3/3 = 5/3 ≈ 1.67

Step4
ค่าที่ไม่ได้อยู่บริเวณขอบก็ใช้หลักการเดียวกับ step 2 กับ 3 ในการค่า เช่นต้องการหาค่าที่ (2, 2) ก็สามารถใช้ค่าจาก (1, 2) กับ (4, 2) มาคำนวณได้ [(4–2) / (4–1)]×5/3 + [(2–1) / (4–1)]×8/3 = 10/9 + 8/9 = 18/9 = 2

Step5
คำนวณไปเรื่อยๆจนหาค่าครบทุกช่อง

จากตัวอย่างด้านบนสามารถใช้ PyTorch เขียนออกมาได้ว่า
import torch
import torch.nn.functional as F

input_tensor = torch.tensor([[[[1., 2.],
                               [3., 4.]]]])
# ใช้ torch.nn.functional เพื่อคำนวณ bilinear interpolation เมื่อ factor=2
output_tensor = F.interpolate(input=input_tensor, scale_factor=2, mode="bilinear", align_corners=True)
ได้ผลลัพธ์ออกมาคือ
tensor([[[[1.0000, 1.3333, 1.6667, 2.0000],
          [1.6667, 2.0000, 2.3333, 2.6667],
          [2.3333, 2.6667, 3.0000, 3.3333],
          [3.0000, 3.3333, 3.6667, 4.0000]]]])
ตัวอย่างที่ 2
กำหนด input ขนาด 3 × 3 มีค่าด้านในคือ

ดังนั้น output ที่ออกมามีขนาด 6 × 6
Step1
คล้ายกับตัวอย่างที่ 1 นำค่าของ input อยู่ที่มุมของ output แต่เรื่องจาก output ที่ออกมามีขนาดเป็นเลขคู่ ดังนั้นค่าที่อยู่ตรงกลางของ input จึงไม่มีช่องให้อยู่ใน output ดังนั้นกำหนดให้ค่า input เหล่านั้นอยู่ในตำแหน่งกึ่งกลางระหว่างมุม ทั้ง 2 ด้าน

Step2
ใช้วิธีเดียวกับตัวอย่าง1, หาค่าในตำแหน่งที่ยังไม่ทราบค่า เช่นต้องการทราบค่าของพิกัด (2, 1) เพราะว่าตำแหน่งที่ทราบค่าที่อยู่ใกล้ (2, 1) คือ (1, 1) และ (3.5, 1) ดังนั้นคำนวณออกมาได้ [(3.5–2) / (3.5–1)]×1 + [(2–1) / (3.5–1)]×0 = 1.5/2.5 = 0.6

Step3
คำนวณไปเรื่อยๆจนหาค่าครบทุกช่อง

จากตัวอย่างด้านบนสามารถใช้ PyTorch เขียนออกมาได้ว่า
import torch
import torch.nn.functional as F

input_tensor = torch.tensor([[[[1., 0., 2.],
                               [3., 1., 2.],
                               [0., 2., 1.]]]])

output_tensor = F.interpolate(input=input_tensor, scale_factor=2, mode="bilinear", align_corners=True)
ได้ผลลัพธ์ออกมาคือ
tensor([[[[1.0000, 0.6000, 0.2000, 0.4000, 1.2000, 2.0000],
          [1.8000, 1.2400, 0.6800, 0.7200, 1.3600, 2.0000],
          [2.6000, 1.8800, 1.1600, 1.0400, 1.5200, 2.0000],
          [2.4000, 1.9200, 1.4400, 1.3200, 1.5600, 1.8000],
          [1.2000, 1.3600, 1.5200, 1.5600, 1.4800, 1.4000],
          [0.0000, 0.8000, 1.6000, 1.8000, 1.4000, 1.0000]]]])
2. นำไปรวมกับข้อมูลฝั่ง encoder ผ่าน skip connection
เนื่องจากระหว่าง encoder อาจมีบาง feature ที่หายไป ดังนั้นจึงจำเป็นต้องใช้ skip connection เพื่อรื้อฟื้นมาอีกครั้ง โดย skip connection ถูกกล่าวถึงครั้งแรกในโมเดล Residual Network (ResNet)
U-Net ฝั่ง decoder สามารถแบ่งเป็น 5 block เช่นเดียวกับ encoder ตามภาพด้านล่าง

โดย encoder แต่ละ block จะเชื่อมกับ decoder ที่อยู่ block เดียวกัน ผ่าน skip connection
จากภาพด้านล่างเห็นได้ว่าขนาดของรูปภาพฝั่ง encoder ใหญ่กว่าฝั่ง decoder เพราะว่า U-Net ใน paper ซึ่งคือ U-Net แบบดั้งเดิม ไม่มีการทำ padding ทั้งใน encoder และใน decoder แต่ถ้าเป็น U-Net สมัยใหม่บางโมเดลก็จะมีการทำ padding ทั้งสองส่วน เพื่อควบคุมให้รูปภาพ 2 ฝั่งมีขนาดเท่ากัน

วิธีนำข้อมูลฝั่ง encoder มาเชื่อมกับ decoder ทั้งที่ขนาด 2 ฝั่งไม่เท่ากับคือตัดเอาเฉพาะภาพตรงกลาง (center crop) ของ encoder ให้ออกมาขนาดเท่ากับ decoder แล้วค่อยเอามาต่อกัน
ยกตัวอย่างกรณี block 1 ฝั่ง encoder มีรูปร่าง (64, 568, 568) ฝั่ง decoder หลังไปรวมกับ encoder ได้รูปร่างคือ (128, 392, 392) สามารถใช้ PyTorch เขียนออกมาได้ว่า
import torch
import torch.nn as nn

# สร้าง function สำหรับทำ center crop
def center_crop(encoder, target_size):
    b, c, h, w = encoder.shape
    tar_h, tar_w = target_size

    start_h = (h-tar_h) // 2
    start_w = (w-tar_w) // 2

    cropped_encoder = encoder[:, :, start_h:start_h+tar_h, start_w:start_w+tar_w]
    return cropped_encoder

# สร้าง encoder และ decoder จำลองขึ้นมา โดยสุ่มค่าที่อยู่ด้านใน
# จากภาพด้านบน encoder รูปร่าง (B, C, H, W) = (1, 64, 568, 568)
encoder = torch.randn(1, 64, 568, 568)
# จาพภาพด้านบน ขนาด decoder คือ (H, W) = (392, 392) กำหนดให้มี 64 filter เพราะเมื่อนำไปต่อกับ encoder จะได้มี 64+64=128 filters ตามภาพด้านบน
decoder = torch.randn(1, 64, 392, 392)

cropped_encoder = center_crop(encoder, decoder.shape[2:])

# ใช้ torch.cat เพื่อนำ encoder ต่อกับ decoder
out_tensor = torch.cat((cropped_encoder, decoder), dim=1)
print(out_tensor.shape)
ได้ผลลัพธ์ออกมาคือ
torch.Size([1, 128, 392, 392])3. นำข้อมูลเข้า convolutional layer
หลังจาก upsampling และรวมกับ encoder แล้ว ก็ยังคงต้องเข้า convolutional layer อีกเพื่อดึง feature ที่สำคัญออกมาเช่นเดิม หลักการของ layer นี้เหมือน convolutional layer ที่อยู่ใน CNN
3. ตัวอย่างการสร้าง U-Net ด้วย PyTorch อย่างง่าย
เราจะสร้างทั้งหมด 2 โมเดล คือ U-Net แบบดั้งเดิมตามที่อยู่ใน paper กับ U-Net สมัยใหม่ที่ปรับปรุงโครงสร้างบางส่วนเพื่อเพิ่มประสิทธิภาพ โดยสร้างเป็น class ย่อยๆของแต่ละส่วน แล้วค่อยเอามารวมกัน
3.1 U-Net แบบดั้งเดิม
Double Convolution

import torch.nn as nn

class DoubleConv(nn.Module):
    def __init__(self, in_channels, out_channels):
        super().__init__()
        self.double_conv = nn.Sequential(
            nn.Conv2d(in_channels=in_channels, out_channels=out_channels, kernel_size=3, stride=1, padding=0),
            nn.ReLU(inplace=True),

            nn.Conv2d(in_channels=out_channels, out_channels=out_channels, kernel_size=3, stride=1, padding=0),
            nn.ReLU(inplace=True)
        )

    def forward(self, x):
        return self.double_conv(x)
Down

import torch.nn as nn

class Down(nn.Module):
    def __init__(self, in_channels, out_channels):
        super().__init__()
        self.down = nn.Sequential(
            nn.MaxPool2d(kernel_size=2, stride=2),
            # นำ class DoubleConv ที่เคยสร้างไว้มาใช้ต่อเลย
            DoubleConv(in_channels=in_channels, out_channels=out_channels)

        )

    def forward(self, x):
        return self.down(x)
Up

import torch
import torch.nn as nn

class Up(nn.Module):
    def __init__(self, in_channels, out_channels):
        super().__init__()
        self.up_conv = nn.ConvTranspose2d(in_channels=in_channels, out_channels=in_channels//2, kernel_size=2, stride=2, padding=0)
        self.double_conv = DoubleConv(in_channels=in_channels, out_channels=out_channels)

    def center_crop(self, encoder, target_size):
        h, w = encoder.shape[2:]
        tar_h, tar_w = target_size

        start_h = (h - tar_h) // 2
        start_w = (w - tar_w) // 2

        cropped_encoder = encoder[:, :, start_h:start_h + tar_h, start_w:start_w + tar_w]
        return cropped_encoder

    def forward(self, x1, x2):
        x1 = self.up_conv(x1)

        x2 = self.center_crop(x2, x1.shape[2:])
        return self.double_conv(torch.cat((x2, x1), dim=1))
Out Convolution

import torch.nn as nn

class OutConv(nn.Module):
    def __init__(self, in_channels, out_channels):
        super().__init__()
        self.conv = nn.Conv2d(in_channels=in_channels, out_channels=out_channels, kernel_size=1, stride=1, padding=0)

    def forward(self, x):
        return self.conv(x)
สุดท้ายเอาทุกส่วนมารวมกันเป็น U-Net

class UNet(nn.Module):
    def __init__(self, n_channels, n_classes):
        super().__init__()
        self.inc = DoubleConv(in_channels=n_channels, out_channels=64)
        self.down1 = Down(in_channels=64, out_channels=128)
        self.down2 = Down(in_channels=128, out_channels=256)
        self.down3 = Down(in_channels=256, out_channels=512)
        self.down4 = Down(in_channels=512, out_channels=1024)

        self.up1 = Up(in_channels=1024, out_channels=512)
        self.up2 = Up(in_channels=512, out_channels=256)
        self.up3 = Up(in_channels=256, out_channels=128)
        self.up4 = Up(in_channels=128, out_channels=64)
        self.outc = OutConv(in_channels=64, out_channels=n_classes)

    def forward(self, x):
        x1 = self.inc(x)
        x2 = self.down1(x1)
        x3 = self.down2(x2)
        x4 = self.down3(x3)
        x5 = self.down4(x4)

        x = self.up1(x5, x4)
        x = self.up2(x, x3)
        x = self.up3(x, x2)
        x = self.up4(x, x1)

        return self.outc(x)
เมื่อใช้ torchsummary.summary แสดง output ของแต่ละ layer จะเห็นว่าตรงกับโครงสร้างในรูปภาพด้านบน
from torchsummary import summary

model = UNet(n_channels=1,  n_classes=2)
summary(model, (1, 572, 572))
ได้ผลลัพธ์คือ
----------------------------------------------------------------
        Layer (type)               Output Shape         Param #
================================================================
            Conv2d-1         [-1, 64, 570, 570]             640
              ReLU-2         [-1, 64, 570, 570]               0
            Conv2d-3         [-1, 64, 568, 568]          36,928
              ReLU-4         [-1, 64, 568, 568]               0
        DoubleConv-5         [-1, 64, 568, 568]               0
         MaxPool2d-6         [-1, 64, 284, 284]               0
            Conv2d-7        [-1, 128, 282, 282]          73,856
              ReLU-8        [-1, 128, 282, 282]               0
            Conv2d-9        [-1, 128, 280, 280]         147,584
             ReLU-10        [-1, 128, 280, 280]               0
       DoubleConv-11        [-1, 128, 280, 280]               0
             Down-12        [-1, 128, 280, 280]               0
        MaxPool2d-13        [-1, 128, 140, 140]               0
           Conv2d-14        [-1, 256, 138, 138]         295,168
             ReLU-15        [-1, 256, 138, 138]               0
           Conv2d-16        [-1, 256, 136, 136]         590,080
             ReLU-17        [-1, 256, 136, 136]               0
       DoubleConv-18        [-1, 256, 136, 136]               0
             Down-19        [-1, 256, 136, 136]               0
        MaxPool2d-20          [-1, 256, 68, 68]               0
           Conv2d-21          [-1, 512, 66, 66]       1,180,160
             ReLU-22          [-1, 512, 66, 66]               0
           Conv2d-23          [-1, 512, 64, 64]       2,359,808
             ReLU-24          [-1, 512, 64, 64]               0
       DoubleConv-25          [-1, 512, 64, 64]               0
             Down-26          [-1, 512, 64, 64]               0
        MaxPool2d-27          [-1, 512, 32, 32]               0
           Conv2d-28         [-1, 1024, 30, 30]       4,719,616
             ReLU-29         [-1, 1024, 30, 30]               0
           Conv2d-30         [-1, 1024, 28, 28]       9,438,208
             ReLU-31         [-1, 1024, 28, 28]               0
       DoubleConv-32         [-1, 1024, 28, 28]               0
             Down-33         [-1, 1024, 28, 28]               0
  ConvTranspose2d-34          [-1, 512, 56, 56]       2,097,664
           Conv2d-35          [-1, 512, 54, 54]       4,719,104
             ReLU-36          [-1, 512, 54, 54]               0
           Conv2d-37          [-1, 512, 52, 52]       2,359,808
             ReLU-38          [-1, 512, 52, 52]               0
       DoubleConv-39          [-1, 512, 52, 52]               0
               Up-40          [-1, 512, 52, 52]               0
  ConvTranspose2d-41        [-1, 256, 104, 104]         524,544
           Conv2d-42        [-1, 256, 102, 102]       1,179,904
             ReLU-43        [-1, 256, 102, 102]               0
           Conv2d-44        [-1, 256, 100, 100]         590,080
             ReLU-45        [-1, 256, 100, 100]               0
       DoubleConv-46        [-1, 256, 100, 100]               0
               Up-47        [-1, 256, 100, 100]               0
  ConvTranspose2d-48        [-1, 128, 200, 200]         131,200
           Conv2d-49        [-1, 128, 198, 198]         295,040
             ReLU-50        [-1, 128, 198, 198]               0
           Conv2d-51        [-1, 128, 196, 196]         147,584
             ReLU-52        [-1, 128, 196, 196]               0
       DoubleConv-53        [-1, 128, 196, 196]               0
               Up-54        [-1, 128, 196, 196]               0
  ConvTranspose2d-55         [-1, 64, 392, 392]          32,832
           Conv2d-56         [-1, 64, 390, 390]          73,792
             ReLU-57         [-1, 64, 390, 390]               0
           Conv2d-58         [-1, 64, 388, 388]          36,928
             ReLU-59         [-1, 64, 388, 388]               0
       DoubleConv-60         [-1, 64, 388, 388]               0
               Up-61         [-1, 64, 388, 388]               0
           Conv2d-62          [-1, 2, 388, 388]             130
          OutConv-63          [-1, 2, 388, 388]               0
================================================================
Total params: 31,030,658
Trainable params: 31,030,658
Non-trainable params: 0
----------------------------------------------------------------
Input size (MB): 1.25
Forward/backward pass size (MB): 2683.55
Params size (MB): 118.37
Estimated Total Size (MB): 2803.17
----------------------------------------------------------------
3.2 U-Net สมัยใหม่

U-Net สมัยใหม่ได้รับการต่อยอดจาก U-Net แบบดั้งเดิมที่ถูกเผยแพร่ตั้งแต่ปี 2015 ซึ่งมีโครงสร้างแต่ต่างกันตามวัตุประสงค์การใช้งาน ไม่ว่าจะเป็นจำนวน layer, วิธีการทำ upsampling, การเชื่อมของ skip connection แต่สิ่งสำคัญที่ต่อยอดจาก U-Net แบบดั้งเดิงคือการทำ normalization ระหว่าง layer และใช้ padding ใน convolutional layer สามารถดูตัวอย่าง U-Net สมัยใหม่ใน github นี้ ซึ่งแต่ละส่วนของ U-Net โมเดลนี้ ได้แก่
Double Convolution
class DoubleConv(nn.Module):
    """(convolution => [BN] => ReLU) * 2"""

    def __init__(self, in_channels, out_channels, mid_channels=None):
        super().__init__()
        if not mid_channels:
            mid_channels = out_channels
        self.double_conv = nn.Sequential(
            # ทำ padding ใน convolutional layer
            nn.Conv2d(in_channels, mid_channels, kernel_size=3, padding=1, bias=False),
            # ทำ batch normalization หลังออกจาก convolutional layer
            nn.BatchNorm2d(mid_channels),
            nn.ReLU(inplace=True),
            nn.Conv2d(mid_channels, out_channels, kernel_size=3, padding=1, bias=False),
            nn.BatchNorm2d(out_channels),
            nn.ReLU(inplace=True)
        )

    def forward(self, x):
        return self.double_conv(x)
Down
class Down(nn.Module):
    """Downscaling with maxpool then double conv"""

    def __init__(self, in_channels, out_channels):
        super().__init__()
        self.maxpool_conv = nn.Sequential(
            nn.MaxPool2d(2),
            DoubleConv(in_channels, out_channels)
        )

    def forward(self, x):
        return self.maxpool_conv(x)
Up
class Up(nn.Module):
    """Upscaling then double conv"""

    def __init__(self, in_channels, out_channels, bilinear=True):
        super().__init__()

        # if bilinear, use the normal convolutions to reduce the number of channels
        if bilinear:
            self.up = nn.Upsample(scale_factor=2, mode='bilinear', align_corners=True)
            self.conv = DoubleConv(in_channels, out_channels, in_channels // 2)
        else:
            self.up = nn.ConvTranspose2d(in_channels, in_channels // 2, kernel_size=2, stride=2)
            self.conv = DoubleConv(in_channels, out_channels)

    def forward(self, x1, x2):
        x1 = self.up(x1)
        # input is CHW
        diffY = x2.size()[2] - x1.size()[2]
        diffX = x2.size()[3] - x1.size()[3]

        x1 = F.pad(x1, [diffX // 2, diffX - diffX // 2,
                        diffY // 2, diffY - diffY // 2])

        x = torch.cat([x2, x1], dim=1)
        return self.conv(x)
Out Convolution
class OutConv(nn.Module):
    def __init__(self, in_channels, out_channels):
        super(OutConv, self).__init__()
        self.conv = nn.Conv2d(in_channels, out_channels, kernel_size=1)

    def forward(self, x):
        return self.conv(x)
สุดท้ายเอาทุกส่วนมารวมกันเป็น U-Net
class UNet(nn.Module):
    def __init__(self, n_channels, n_classes, bilinear=False):
        super(UNet, self).__init__()
        self.n_channels = n_channels
        self.n_classes = n_classes
        self.bilinear = bilinear

        self.inc = (DoubleConv(n_channels, 64))
        self.down1 = (Down(64, 128))
        self.down2 = (Down(128, 256))
        self.down3 = (Down(256, 512))
        factor = 2 if bilinear else 1
        self.down4 = (Down(512, 1024 // factor))
        self.up1 = (Up(1024, 512 // factor, bilinear))
        self.up2 = (Up(512, 256 // factor, bilinear))
        self.up3 = (Up(256, 128 // factor, bilinear))
        self.up4 = (Up(128, 64, bilinear))
        self.outc = (OutConv(64, n_classes))

    def forward(self, x):
        x1 = self.inc(x)
        x2 = self.down1(x1)
        x3 = self.down2(x2)
        x4 = self.down3(x3)
        x5 = self.down4(x4)
        x = self.up1(x5, x4)
        x = self.up2(x, x3)
        x = self.up3(x, x2)
        x = self.up4(x, x1)
        logits = self.outc(x)
        return logits